
You’ve been assigned an ESL course to teach, given learning outcomes, and maybe even been given a textbook to teach from, but how do you decide how to organize your course? Which readings, activities, projects and assessments should you incorporate? Should you just teach to the book starting at page 1? Though there are different approaches to course planning, this blog post will introduce you to backward course design, walk you through the three stages, and show an example of how it can be implemented.
What is backward course design?
Backward course design is a framework for creating a course with the learning outcomes as the driver of the decisions made. Backward course design begins with the question — What do I want my students to know or be able to do by the end of the course?, and then works back from there.
Why use backward course design?
Originally proposed by Ralph Tyler in 1948, Wiggins and McTighe (2005) provide a template for implementing backward course design in their book Understanding by Design. According to Wiggins and McTighe, teachers too often focus on the teaching instead of the learning. That is when creating a course, they consider the textbook and the activities first and the results second. Instead, they argue that teachers should first consider what the learning outcomes are and what students need in order to achieve these. To do this, Wiggins and McTighe offer a three-stage approach, which I explain below.
Three stages of backward course design
- Stage 1. Identify the desired results. The desired results of a course are often called student learning outcomes (SLOs). These are often developed by the program and articulate what a student should know or be able to do by the end of the course. With backward course design, this is where you start your planning.
- Stage 2. Determine acceptable results. How will you be able to tell whether a student has met a learning outcome? You must create a means of assessing this. Whether by creating an exam or a task-based project, the second stage of backward course design is about creating an assessment tool that will let you know if a student has met the outcome.
- Stage 3. Plan learning experiences and instruction. Now that you have established learning outcomes and have assessments in place to evaluate whether students have met the outcomes, you can now plan instruction that will prepare students for those assessments. What activities can you incorporate that will help students build the skills needed to achieve the learning outcome?
When I am planning a course, I love to use sticky notes throughout each stage. Google’s Jamboard works great if you don’t want to use physical sticky notes. Below is an example of how I arrange my sticky notes while working through these three stages.

Implementing backward course design
Now let’s work through an example. Let’s say one of the learning outcomes of your class is for students to be able to paraphrase sources and incorporate them into their writing (stage 1). To assess whether students are able to do this, you most likely will assign an essay that requires students to paraphrase sources a number of times (stage 2). This is the assessment that will show whether they have met the learning outcome. However, before jumping to assigning this essay, you need to build in instruction and activities that will help your students develop the skills needed to achieve this result (stage 3).
Creating a course plan
Once I have all the sticky notes needed to complete the course, I then create a grid divided into the weeks and days of the course. I keep the SLO sticky notes off to the side, so I am reminded of my goals. Then I determine where I want the assessments to go. Some assessments make sense to wait until the end of the course, while others can come sooner. Once I know where I think I want the assessments, I add in the activity sticky notes. I repeat these steps with all of my sticky notes and then rearrange as needed. Below is an example of how I might begin course planning with my first SLO.
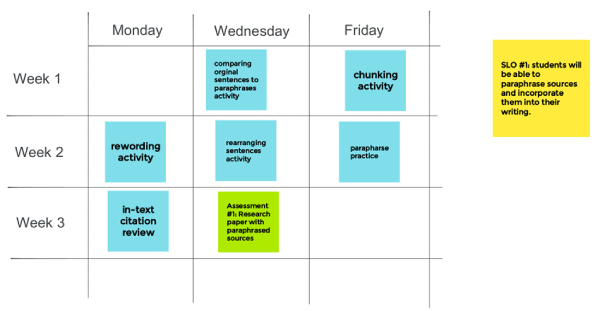
To me, one of the major benefits of backward course design is that it helps me visualize the course thereby ensuring I have built in enough instruction and practice opportunities for students before I assess the skill. If you are interested in learning more about my approach to teaching paraphrasing, check out my previous blog post on this topic.
- How do you plan your courses? We’d love to hear about it on our LinkedIn page.
About the author
Based in Savannah, Georgia, Misty Wilson is an experienced English as a Second Language instructor.